Digging in to SAML Attributes

One of the common projets I'm often times engaged in is Single Sign-On migrations from a previous IdP to Microsoft Entra. Typically these projects are pretty structured. Do some planning to determine which apps need to be moved, prestage applications in the environment, start coordinating with Application Owners on requirements around configuration and claims, and then cutover the application at a predetermined time. Other than the sometimes painful work of communicating and coordinating with App Owners to discuss configuration and figure out if a Vendor has to get involved, attributes and claims are an easy thing to get wrong. It's easy to sidestep attributes when learning about SAML and not spend any time thinking about each claim is and how it's used, but then I feel like you're left with an incomplete view of how SAML actually works. This post is my attempt to grapple with them just a little bit more intentionally.
First: Things to play with
For learning more about SAML and testing out configurations, you need some tooling and testkits. If your org has some DEV instances of popular applications that are SSO compatible, the sites portion of this may not work. If you're doing this in a lab or personal tenant, however, here's some fun stuff to check out.
Sites for testing SSO:
These websites allow you test test doing SAML-based SSO with some token decoding to go with.
- RSA IAM Showcase - This is a great test Service Provider that is easy to setup and easy to test with. The instructions are clear, and you can test both Service Provider and Identity Provider flows. The key on this one is the "protected page" which can only be access after a successful SAML response. To make it more fun, you can use the Relay feature to change the color of the protected page so you know it works.
- Microsoft SAML Toolkit - This is pretty similar to RSA Showcase, but the Microsoft Flavor. The key difference is you can sign up and create your own "tenant" so you can get unique endpoints, but it doesn't have much customization.
- SSO Toolkit - Atomic Entra - Shameless Plug. I recently built this (with a ton of help from some coding agents as I'm not dev) to help me test out SSO configs using both SAML and OIDC. It's free and open to use. Be warned: There may be bugs still, so use at your own risk, but so far I can at least do authenticated and signed SAML requests. I'm working on a "SAML RULES" section that allows you to "expect" certain claims from the IdP like you would an enterprise app. If you just want a decoder, there's one on the homepage that you can use without signing in.
Tools to use:
When it comes to tooling for looking into SAML Tokens, I've really enjoyed the following:
- The plugin from Darren "Doc" Robinson called Entra Auth Tracer. He wrote an excellent blog post about it that you can find here.
- samltool.io is a super simple SAML assertion/response decoder. Plop the XML in and it'll decode the claims for you and a human-readable format. Great for quickly validating a claim.
Now the fun: What are SAML Attributes?
A SAML Assertion (which I think is also interchangeable with Token) is an XML document containing a set amount of information about a "Subject", which is typically a User, provided by an Identity Provider. We group this information in different "Statements." In SAML 2.0 there are 3 different types of statements define that can go into a SAML Assertion:
- Authentication Statement: "How did I authenticate myself?"
- Authorization Decision Statement: "Access granted, or access denied"
- Attribute Statement : "Here's all the info about your subject that you asked for"
Other than the "Subject" field, which tells the Service Provider which user this Assertion is about, the Attribute Statement is the main place where we can tell the Service Provider things about our Users. Below is an example Attribute Statement from a successful SSO attempt to my SSO Toolkit (sanitized a little since I'd like to keep my lab safe 😬):
    <AttributeStatement>
      <Attribute Name="http://schemas.microsoft.com/identity/claims/tenantid">
        <AttributeValue>[TENANT ID]</AttributeValue>
      </Attribute>
      <Attribute Name="http://schemas.microsoft.com/identity/claims/objectidentifier">
        <AttributeValue>[OBJECT ID OF MY USER ACCOUNT]</AttributeValue>
      </Attribute>
      <Attribute Name="http://schemas.microsoft.com/identity/claims/displayname">
        <AttributeValue>Gabe Corsini</AttributeValue>
      </Attribute>
      <Attribute Name="http://schemas.microsoft.com/identity/claims/identityprovider">
        <AttributeValue>https://sts.windows.net/[TENANT ID]/</AttributeValue>
      </Attribute>
      <Attribute Name="http://schemas.microsoft.com/claims/authnmethodsreferences">
        <AttributeValue>http://schemas.microsoft.com/ws/2008/06/identity/authenticationmethod/password</AttributeValue>
        <AttributeValue>http://schemas.microsoft.com/claims/multipleauthn</AttributeValue>
      </Attribute>
      <Attribute Name="http://schemas.xmlsoap.org/ws/2005/05/identity/claims/givenname">
        <AttributeValue>Gabe</AttributeValue>
      </Attribute>
      <Attribute Name="http://schemas.xmlsoap.org/ws/2005/05/identity/claims/surname">
        <AttributeValue>Corsini</AttributeValue>
      </Attribute>
      <Attribute Name="http://schemas.xmlsoap.org/ws/2005/05/identity/claims/emailaddress">
        <AttributeValue>[EMAIL ADDRESS]</AttributeValue>
      </Attribute>
      <Attribute Name="http://schemas.xmlsoap.org/ws/2005/05/identity/claims/name">
        <AttributeValue>[EMAIL ADDRESS]</AttributeValue>
      </Attribute>
    </AttributeStatement>
The first few lines of the Attribute statement carry over some default information from the IdP to the SP. Things like tenantid, objectidentifier, displayname, identityprovider, and authnmethodsreferences are default attributes that will always be included in the token. Entra will always send this information, regardless of the number of claims you transmit from the application.
Note
I can't find anything that actually states that displayname is an always default claim like the other 4 claims, so I wouldn't rely on it being persistent throughout all tokens.
The second set of claims in this statement, from givenname to name, match the claims that I have defined in the enterprise application to be transmitted from the IdP to the service provider. The beautifully illustrated photo below shows that.
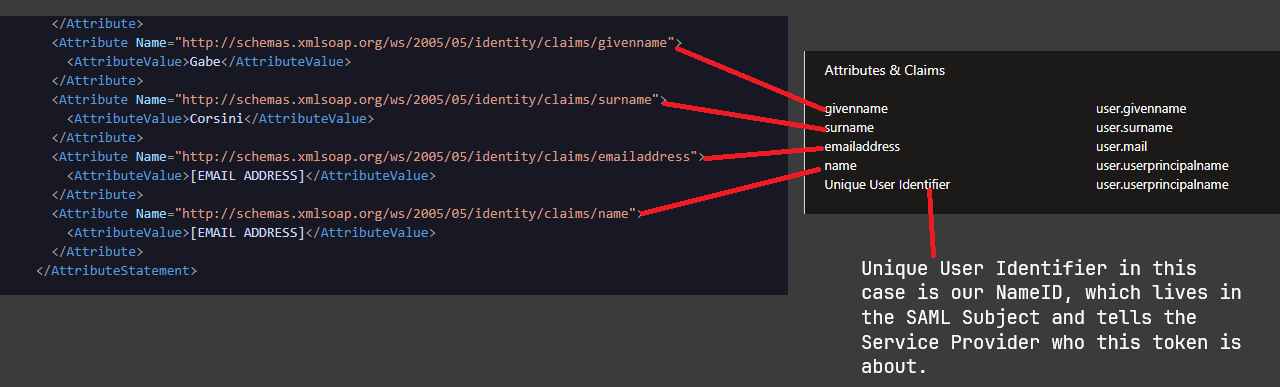
This particular area is where things get interesting for me. What you see in the image above were the default claims Entra populated when I create this SSO application. As long as my service provider knows to expect these claims, it will accept them regardless if they follow a naming convention that makes sense or have an attribute schema. From what I've gathered from the SAML 2.0 specification and good ole wikipedia, the schema URIs are solely for interoperability and added information, and don't actually serve any function of validating that the data I am sending in the claim meets some sort of format. If, for example, I changed givenname to firstname and removed the URI namespace I could still very well get a valid token from the IdP and connect to the service provider
<Attribute Name="firstname">
  <AttributeValue>Gabe</AttributeValue>
</Attribute>
The only time the changing of the attribute names matters is if the service provider is expecting a specifically named attribute. If my service provider expects to recieve an attribute called givenname, but I choose to send it firstname, the SSO attempt will fail. I created a rule in SSO toolkit for this just to see:
[
  {
    "ruleId": "a6d6d7b6-f006-4361-9ef8-50badb65c33c",
    "claimName": "givenname",
    "operator": "exists",
    "expectedValue": "null",
    "pass": false,
    "reason": "claim does not exist or is empty"
  }
]
Once I change the rule to expect firstname, the rule passes again:
[
  {
    "ruleId": "a6d6d7b6-f006-4361-9ef8-50badb65c33c",
    "claimName": "firstname",
    "operator": "exists",
    "expectedValue": null,
    "actualValue": "Gabe",
    "pass": true
  }
]
Assuming you have control over your service provider and aren't at the whim of a vendor, the sky is pretty much the limit on how you set up these claims as long as you follow the requirements of your service provider. Some SPs will be pretty rigid and require you to send specific claims with specific names, forcing you to edit the claims on the IdP side to match. Others will have builtin logic to check for multiple different claim name variations that could come in, and some yet will allow you modify the names at the service provider, giving you additional varying degrees of control over the names of your claims and how they are presented from the IdP.
SAML attributes, and SAML in general, can be summarized a little like so:
"Send me whatever attributes we agreed on, and we will sort it out."
Summary
SAML is basically magical contracts where we make up names for what we went to tell our service providers, make sure they agree on the names, then fire away. This doesn't even touch on doing custom transformations and expressions on the IdP side of things (something I will hopefully touch on soon), where we can get ourselves even more confused by crafting custom logic to send custom data to service providers to do... God knows what.
I hope you enjoyed my little dive into SAML. I hope you'll check out SSO Toolkit and let me know what you think!